
Making ice cream in a bag with kids might be the perfect activity. It combines so many elements of learning and playing–plus there’s ice cream waiting at the end! This activity involves literacy practice (reading a recipe), math (measuring and counting), and science (changing states of matter). Children will also work on both fine and gross motor skill development as they measure and pour and later shake the bag. Best of all, though, this is a really fun way to make ice cream at home without the need for a clunky, expensive ice cream making machine. So what are you waiting for? Harness the power of your child’s boundless energy and make ice cream in a bag today!
 The instructions here are for a basic vanilla ice cream recipe which will yield about 5 medium-sized scoops. You can multiply this recipe as many times as you’d like, but make sure you use extra sets of baggies. Too much ice cream mix in one bag will take longer to freeze. Once you’ve mastered vanilla ice cream, try out a different flavor or top your vanilla with the toppings of your choice.
Supplies Needed
The best projects are the ones where you already have the supplies needed at home. This is one of those!
- 1 cup whole milk
- 1 cup half and half
- 3 tbsp sugar
- 1 tsp vanilla extract
- 2 smaller plastic zip baggies: quart sized work well, but you could also use sandwich size
- 2 gallon size plastic zip baggies
- Ice: you’ll need enough to fill a gallon sized bag about halfway
- 1 cup salt: you don’t need ice cream (or rock) salt. Table salt works fine, but if you have coarser / larger salt, that will work better.
- Measuring cups and spoons
- Clock: or some way of keeping time
- Large dish towel: optional, but it’s nice to have to wrap the bag and protect hands from the cold ice
- Toppings: also optional, but sprinkles are always a good idea!
 Instructions
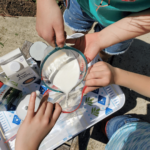
1. Measure 1 cup of whole milk and pour it into one of the smaller baggies. If you don’t have extra hands to help, nesting the baggie into a larger cup will hold it upright while you’re measuring and pouring.
2. Measure 1 cup of half and half and add that to the milk.
3. Measure and add the sugar and vanilla to your milk mixture.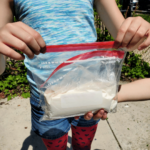
4. Close the baggie, getting out as much air as possible. Then put the milk bag inside of the 2nd smaller baggie. Close that bag as well, getting out the extra air. You’re double bagging to prevent saltwater from getting into the ice cream.
5. Fill one of your gallon bags halfway with ice. Pour in one cup of salt.
6. Place your double-bagged ice cream mixture into the bag of ice and salt. Close the bag, squeezing out extra air.
7. Put the whole thing inside the last gallon sized bag. Again, you’re double bagging because all of the shaking can be rough and this will keep things as mess-free as possible.
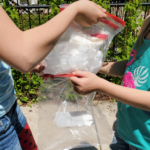
8. Time to shake! Set a timer for 8 minutes and get moving! If the bag gets too cold, wrap it up in the dish towel. Here are a few ideas to keep kids moving and make the time go by faster:

- Make a playlist of fun, upbeat songs. Some shaking favorites are: Twist and Shout, Jump in the Line (Shake Senora), and Shake It Off.
- Use some sidewalk chalk to make a hopscotch game. Hold the ice cream bag as you jump through the course.
- Making ice cream with friends? Spread out into a circle. Take turns shaking for a few seconds, then tossing the bag to someone else.
9. When time is up, very carefully open the three outer bags until you get to the inner bag with the ice cream. Make sure you don’t let any of the salty water get into your ice cream bag. Your ice cream should be thick enough to scoop, but it won’t be as hard as ice cream from the freezer. If it’s not, close it all back up and shake for a few more minutes.
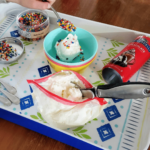
10. The ice cream is ready to enjoy now, but it will be soft and melt quickly. If you want it to be a little firmer, toss the bag into the freezer for up to three hours. If you leave it in the freezer too long, it will freeze solid.