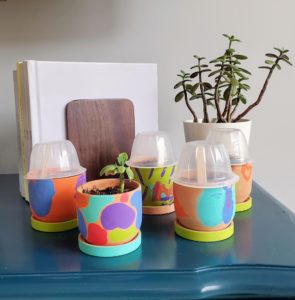
Gardening with children is absolutely magical. There is so much joy in working with your hands in the dirt to grow something from a tiny seed into a living, growing thing. Beyond the wonder of it all, there are innumerable lessons to be learned in gardening. Kids learn patience and nurturing. They will practice following directions and reading–if only on the back of the seed packet. There are lessons about life cycles and the huge swell of pride when that little seedling first emerges.
While gardening with little ones is a rewarding experience, it’s not always a practical one. Gardening takes time and space. If you’re short on both, starting a mini-greenhouse together can be a way to experience the joy of growing something without the responsibility of tending a full garden. This project is extra fun for kiddos as it adds in an element of art as well.
 Supplies Needed
Making a mini-greenhouse requires only a handful of inexpensive supplies–some of which you may already have on hand. Here’s what you’ll need:

- Small terra cotta clay pot: These can be found at craft stores or home improvement stores. The pots in the photos are from the Target Dollar Spot.
- Acrylic paint and brush: Acrylic paint works best for clay pots, but is not clothes-safe, so a smock or old t-shirt is recommended. It does wipe up from most hard surfaces easily. It’s easy to find on the arts and crafts aisle at stores like Target, at craft stores, or online.
- Small, clear plastic cup: If you can’t find a completely transparent cup, translucent will work. Light just needs to be able to get through. Applesauce (or other fruit) cups from the recycling bin work well for this.
- Potting soil: Or just dig up a bit of dirt from your yard if you don’t want to buy a whole bag.
- Seeds of choice: See below for recommendations.
- Popsicle sticks: Don’t have popsicle sticks? Use a Post-It or tape on a small piece of paper to label it.
- Fine point pen or marker
- Spray bottle with water (optional): You’ll need to keep the soil moist. A spray bottle works great, especially with smaller hands, as it prevents over-watering.
Instructions
- Since this project involves both paint and dirt, it’s a good idea to set up outside if that’s an option. Invite your child to paint the outside of the pot any way they’d like. (Avoid painting inside the pot, especially if you’re planting something that will be eaten, like herbs.) Allow the paint to dry. This may take a few hours if the paint is applied thickly.

- When the paint is dry, fill the pot with potting soil. Using your finger, make a small indent in the soil and drop in a few seeds. You can grow anything you’d like. Some kids are drawn to flowers. Marigolds are a fun, hardy plant that will produce many blooms to be picked. Herbs and lettuces are also easy to grow in small containers and grow quickly. Growing something to be eaten is a great way to entice children to try a new food.

- Once the seeds are in the dirt, cover them gently with dirt and water lightly. The soil should be moist, but not puddling. A spray bottle works well as it’s much harder to over-water and kids will love spraying their plants.

- Have your child write the name of the plant they are growing on the top half of a popsicle stick and slide it into the soil near the seeds. Make sure it’s low enough in the dirt that the cup can rest on the surface of the soil. Seeds love a moist, warm environment. Place the clear cup upside down over the soil to create a greenhouse effect. The cup will help maintain the temperature and humidity.

- Find a warm spot to keep your pot that’s out of direct sunlight, but in a place where it will get natural light. If the soil dries out, give it a few more spritzes and cover again. Once your seedling has sprouted, remove the cup and place your pot in a sunny window. Don’t forget to keep watering it as needed.

 If your child loves this project and wants to make more mini-greenhouses, seize the opportunity. These custom-made planters make wonderful presents for Teacher Appreciation Week, Mother’s or Father’s Day, or just because!

