Kids love making art with all kinds of materials: markers, crayons, paint. Now you can amaze your kiddos by making art with a new medium: the sun! As the days get longer and sunnier, making sun prints is a unique way to welcome the warmer weather. This project requires purchasing only the sun print paper. The remaining materials are things you’ve got on hand or can easily swap out.
 Why Kids Will Love This
This is such a fun project, as it gives kids a new way of looking at the world around them. Because you’re making art with the sun, using objects found in nature is usually recommended. You may also encourage your kids to think outside the box and come up with other items to use. Small pieces like Lego bricks can make one-of-a-kind designs. Or use alphabet magnets to spell out messages. Get kids thinking with some questions. What shapes and designs can you make with the objects you’re using? Will you make a pattern or a symmetrical image? Can you tell a story with one picture?
Older kids will enjoy creating more intricate designs and digging deeper on the science behind this photosensitive paper. Younger kids will get a kick out of seeing their images “magically” appear. Children of all ages will get to practice patience as the sun does its thing. Here are step-by-step instructions for making your own sun prints with kids.
Supplies You’ll Need
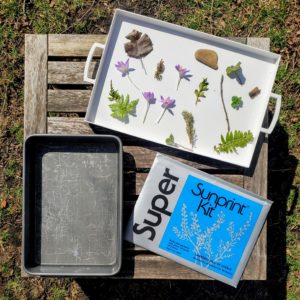 The best part about making sun prints is that you’ll likely only need to purchase the specialty paper. The rest of the items are things you’ve probably got laying around. Here’s what you’ll need:
- Sun print paper: There are lots of options out there. This kit from Amazon includes 15 sheets of paper, plus a clear acrylic sheet for holding items in place, for under $20.
- Cookie sheet: A tray or large piece of cardboard will also work. You’ll want something rigid to put under the paper to make it easier to move around.
- 9×13 baking pan: Again, there are other options here, but you’ll need something that can hold about 1” of water and is large enough to fit the entire sheet of paper.
- Found objects: Go for a walk, hunt around your backyard. Collect bits and pieces of nature. Flatter items work better (than, say, a pinecone). Look for leaves and flowers with interesting profiles. Or find simpler items (like twigs) and use them to make different shapes.
- Water
- Timer/watch (optional)
- Double-sided tape: if you get a paper kit without the acrylic sheet, you may want double-sided tape to hold objects in place on the paper.
 Instructions
- Gather all of your materials, including the objects you’ll use for your design. It’s best to set up your workspace inside or in a shady spot outside. You’ll also need a flat surface (the ground is fine) in a bright sunny spot.
 Note: the sun paper should be kept in the packaging and away from all light until you’re ready to lay out your objects. It will begin exposing immediately. No need to panic, but with smaller kids, it may be a good idea to have them arrange their objects on a regular sheet of paper first to avoid the stress of indecision.
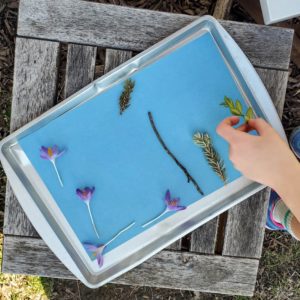
 - Once you have a general idea of what you want the design to look like, take out a piece of the blue sun paper and place it on your cookie sheet. Working quickly, place the objects on the paper and cover with the clear acrylic sheet. Press down a bit to ensure nothing is going to move around. If your items are heavier and/or not flat, you can skip the acrylic sheet; its purpose is only to hold things in place.

- Place the cookie sheet with the sun paper in a bright, sunny spot. Almost instantly, you’ll see the blue paper begin to lighten. Wait until the paper is almost white, or a very pale blue. On a sunny day, this step will only take about 5 minutes. If it’s cloudier, it’s still possible to make sun prints. It will simply take longer to expose. Make sure you don’t move any of your objects while this is happening.
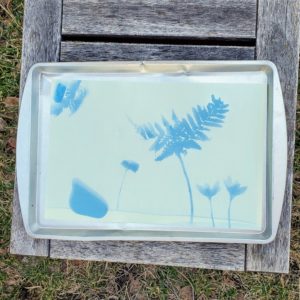
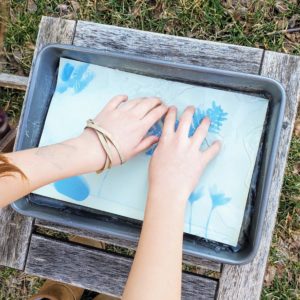
- While your paper is exposing, pour about 1” of water into your baking pan and place it in your shady workspace. Once your paper is nearly white, move your tray out of the sun. Remove the acrylic sheet and the objects. You’ll see the paper is still blue where the items were. Place your paper in the baking pan and submerge under water. Let it sit for about a minute. (You’re washing off the photosensitive chemicals.) Then remove the paper, letting excess water drip off. Place it out of the sun to dry. At this point, your image will be very faint. Don’t worry; Let science do its thing!
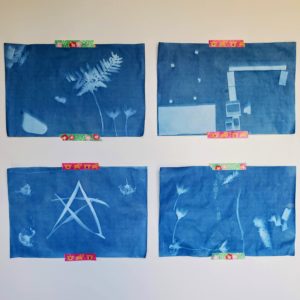
- As the paper dries, your image will reverse again. The shapes from your objects will become a pale blue, almost white. The negative space around it will gradually become a darker blue. Even after the paper is dry, the blue will continue to deepen for a few more hours. You did it! Hang your sun prints on the wall and marvel at your new artwork that you made with the sun!